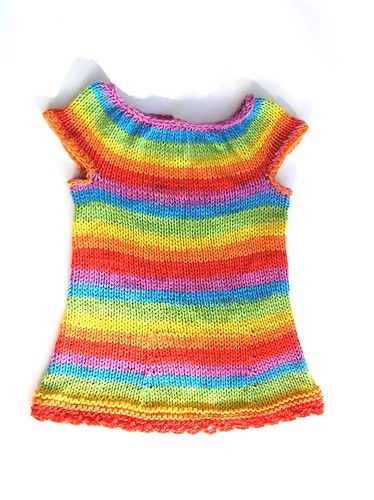
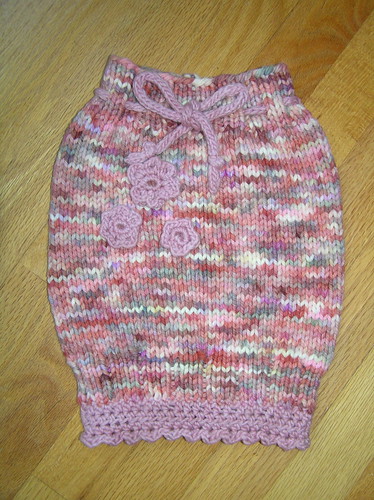
I was tasked by a customer to knit a dress for her soon to be born baby girl. She wanted something sleeveless or with cap sleeves that could be worn with a shirt underneath or soft for next to the skin wear along. She also asked that it fit from newborn as a dress until about a year as a tunic/shirt. I think I came up with something to fit the bill. It shipped a couple of days ago and I can't wait to see how she likes it and how it fits her new baby girl next month! I did try it on one of my daughter's baby dolls that wears real newborn-3 month baby clothing, and it was a perfect fit as a dress! I also tried it on my 2 year old before I did the finishing work, washing and blocking, and it was just a touch too small, so I think it will be the perfect 12mo tunic!
And quick, the un-pattern. Please feel free to use this pattern as you wish for creating personal, charity, or boutique items to sell. I'd love credit if you knit to sell.
Strisce Felice
Size: One-Size: Newborn (as a dress) - 12 months (as a tunic/shirt). Chest, unstretched, measures 16 1/2". Will fit up to 20" chest with negative ease. Bigger sizes can be knit by knitting with a bulkier yarn and larger gauge, or by adding stitches to your cast on.
Gauge:
5.15 spi in stockinette stitch
Materials:
Knit Picks Felici (75% Superwash Merino Wool, 25% Nylon; 218 yd per 50g ball) 2 balls. Knit holding the yarn doubled. Or, you can substitute any other sock yarn held doubled or approximately 200 yards of a DK-light worsted weight yarn.
Size 7 (or needle size to obtain gauge) 16" circular needle
Size 4.5mm crochet hook (optional)
Darning Needle
Button
BODY
CO 111 stitches. Do not yet join in round.
Rows 1-7: Knit flat for 4 garter ridges
Round 8: Join to work in the round, placing a marker at the beginning of your round. *Knit 20, K2tog* 5 times, K1.
Rounds 9-11: Knit
Round 12: *K19, K2tog* 5 times, K1
Rounds 13-15: Knit
Round 16: *K18, K2tog* 5 times, K1
Rounds 17-19: Knit
Round 20: *K17, K2tog* 5 times, K1
Rounds 21-23: Knit
Round 24: *K16, K2tog* 5 times, K1 (you should now have 86 sttiches on your needles)
Continue Knitting until you are 8 1/2" from cast on edge.
ARMHOLES:
Knit 19, BO 6, K36, BO 6, K19
SLEEVES and YOKE:
Round 1: Knit to 17, k2tog, CO 20, s1k1psso, K32, k2tog, CO 20, s1k1psso, K17 (110 stitches)
Rounds 2-10: Knit
Row 11: Turn work and purl. You will no longer be working in the round, but instead knitting flat
Row 12: Knit
Row 13: Purl
Row 14: Knit
Row 15: Purl
Row 16: Knit
Row 17: Purl
Row 18: K2tog across (you will now have 55 stitches on your needle)
Row 19: BO Purlwise.
Finishing:
Seam up garter edge on bottom of dress that you had worked flat.
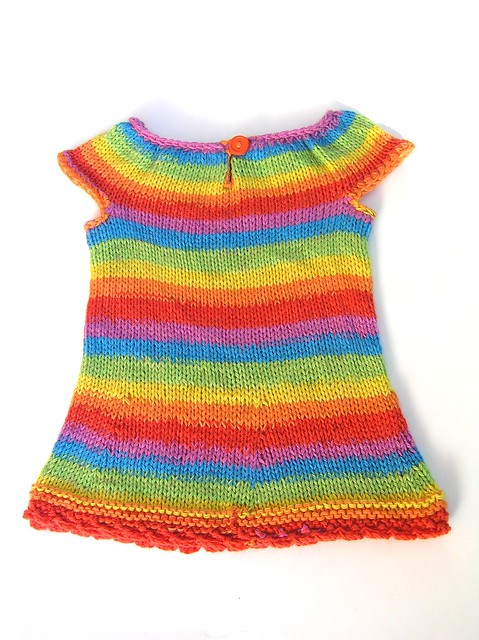
Add a slip stitch edge to the back neck slit using a 4.5mm crochet hook. Add a button loop to one side of the edge and sew a button on to the other. (Optional: Add a crochet lace border along bottom edge and add a crochet trim to the sleeves if desired.) Weave in ends. Wash, block and wear.
Thursday, October 27, 2011
Wednesday, September 28, 2011
Why Wool?
Heather Johnson of Freckle talks a bit about wool as part of your cloth diapering system.
www.hyenacart.com/freckle
Why Wool?
- It is a wonderfully sustainable resource!
- Wool is naturally anti-bacterial, anti-microbial, and anti-fungal.
- Lanolin, the natural oil in wool, helps to make your cover waterproof.
- Lanolin reacts chemically with urine to create a lanolin-soap that makes your wool self cleaning and anti-bacterial.
- Wool can absorb up to 30-40% of its weight in moisture without feeling damp.
- Wool is breathable.
- Wool is warm in the winter and cool in the summer.
- Hand Knit wool pieces are cute, comfortable, can double as a wardrobe piece, and if knit properly can become an heirloom item to preserve and keep for multiple children or even the next generation.
Types of Wool Fabric to use for Diapering
- Knit
- Crochet
- Interlock
- Recycled Wool
What to look for when choosing your hand knit woolies
- You want a piece that is pleasing to the eyes and to the touch.
- Look for a reasonably dense fabric. You do not want a loose knit, as the garment will not stand up to wetness as well.
- You should not see any holes in your fabric and the stitching should look even.
Friday, September 23, 2011
Wonderland, A Holiday Boutique! In-Stock Store
Wonderland, A Holiday Boutique! In-Stock Store
We are stocking today at the Wonderland Congo on Hyenacart. I will have some knits and some wovens available today. Other vendors have great items ranging from soap to jewelry and handspun yarn to baby slippers. Enjoy!
Wednesday, September 21, 2011
Jack-o-Lantern Longies
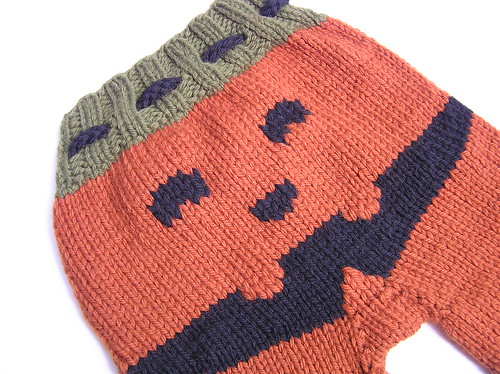
These are one of the most fun knits I've done in a while. Perfect for all of fall and beyond! I hope they find a good home, or perhaps here they will stay? Jackie was a Pumpkin for Halloween at the age of 7 months. Maybe Lily needs to be one at the age of 2 years.
Friday, September 2, 2011
Double Rainbow Double Take
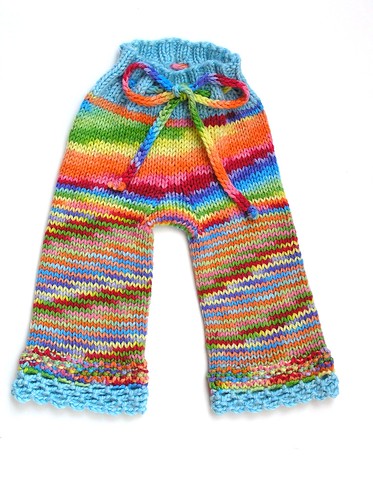
Another little pair of longies for Bitty Fluff. Size small instead of newborn. Trimmed in sky blue. SO soft and squishy!!!!
Thursday, September 1, 2011
Newborn Double Rainbow
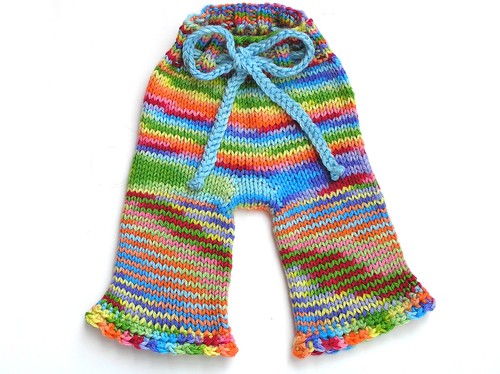
A little bit of funky pooling, but I think it adds character and will make for some ADORABLE wearing! These little longies will be stocked at Bitty Fluff tomorrow. I just love Kara's Double Rainbow colorway!
Wednesday, August 31, 2011
Butterfly Kisses Crocheted
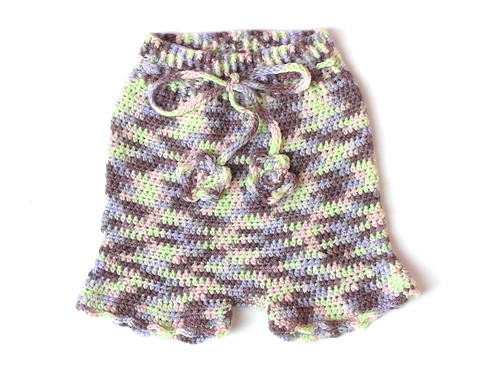
Surprise #1 for Lotus. I haven't crocheted woolies in a while and had forgotten how much I liked to do so. I hope Lotus loves these for her little girl!
Little Red
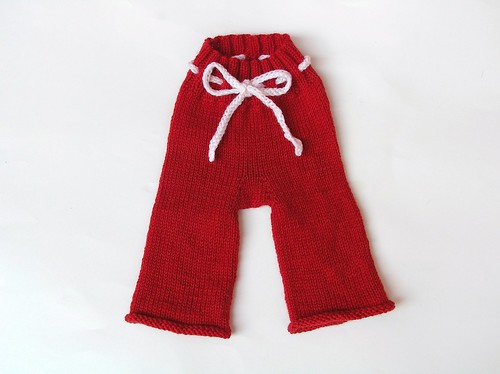
These Little Red longies are destined for Bitty Fluff this Friday. They were so fun to knit and are the perfect Husker Red. I plan to knit up a couple more pair, in various sizes, for Top to Bottom's Fluff Again. I need to get my needles clacking!
Katie's Blue Sky Longies
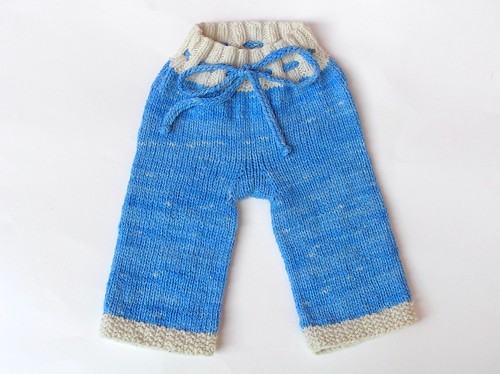
I love knitting these little sky blue longies for a customer who came to Vendor Day at Top to Bottom Baby Boutique! Thank you Katie! I hope you love these and they work well for your little guy!
Monday, May 23, 2011
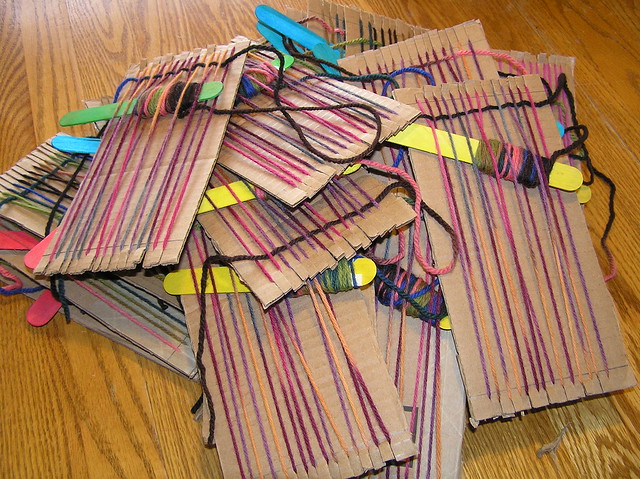
Cardboard Weaving from Earlier this year.
I was asked to speak to Ella's Kindergarten Class in February about knitting and weaving. I ended up making cardboard looms for the class as well. They were a big hit.
Here's a quick summary and some pictures of how to do this at home. (Pics show a knife being used instead of a craft stick. This was on my prototype before I went to the craft store to buy the craft sticks. The kids received no-knife shuttles. LOL)
An alternative to making your own looms is to go to Blick Art Supply. They sell sets of a dozen pre-cut cardboard looms.
A cardboard loom is a great way to introduce children to weaving and to fiber arts in general. They are simple to make and fun to use.
Materials needed:
Cardboard
Scissors
Tape
Yarn
Craft Stick
Large Eyed Needle
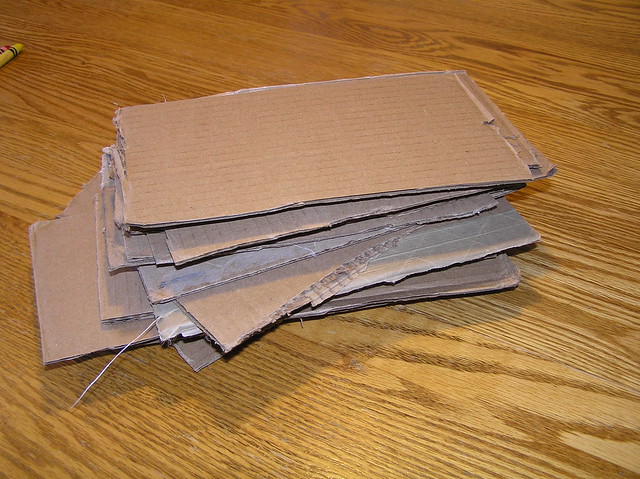
Making the loom
- Cut a piece of cardboard from a box, cereal box or poster board. The piece should be thin enough to easily cut with scissors, but firm enough that it will not bend easily with the weaving.
- Cut slits every quarter inch at the top and bottom of the board as shown.
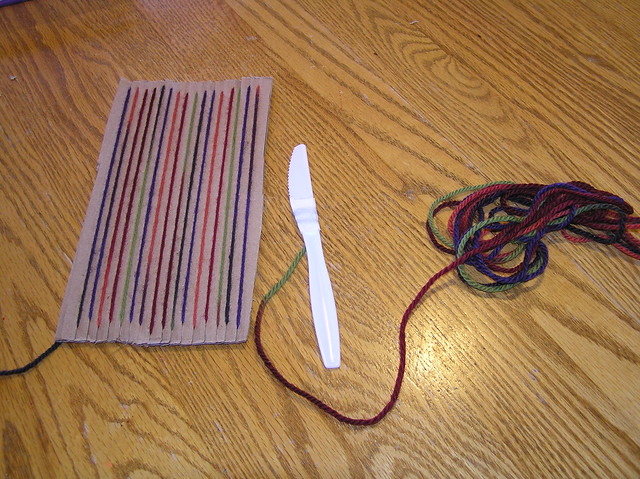
Warping the Loom (Stringing it up)
- Leaving a 3” tail, tape the end of your warp string/yarn to the back, bottom left of your loom.
- Bring the yarn through the bottom left slot and up to the top left slot.
- Wrap around behind the cardboard between the 1st and 2nd slot and bring back through the second slot on top back down to the bottom second slot.
- Wrap around behind the cardboard between the 2nd and 3rd slot and bring back through the third slot on the bottom back up to the third slot on top.
- Continue these stops across the cardboard, finishing at last slot and taping a 3” tail to the back.
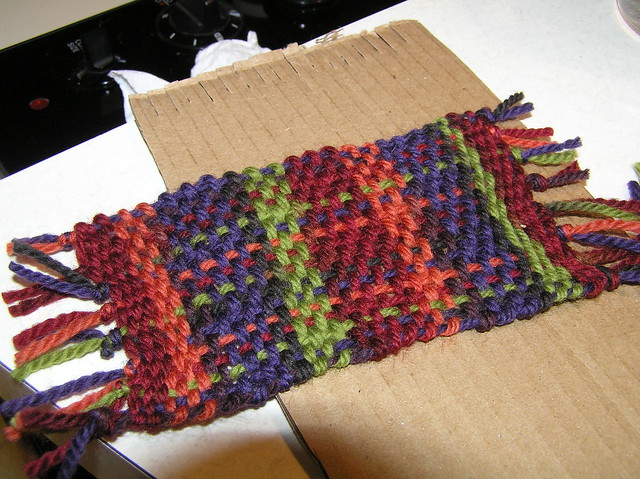
Weaving
- Tape a long piece of yarn to a craft stick.
- Starting at bottom left, begin weaving the yarn through. Over the first warp thread, under then next, over the next, under the next, across the warp.
- When you reach the end of the row, work back across the loom, alternating the over under from the previous pass.
- Every pass or 2, snug up the rows to each other with the end of the craft stick, your fingers, or a wide tooth comb also works well.
- Work as high on the loom as you want, but leave enough warp at top to cut and tie in a knot.
- When you finish, remove piece from loom and knot ends. Trim them to ¼”
- Weave in loose ends using large eyed, blunt needle.
Friday, April 29, 2011
A little unspun fun!
Well, it's been 3 1/2 months since I set up my new blog. Have I blogged on it? No. Have I moved forward with a name change to my store? No to that too. I'm still not sure on the name change for my online shop. Regardless, I feel the new name for at least my blog is very fitting to me!
I have, however, been weaving and knitting up a storm. I have 3 new patterns I'm working to write up. I've joined a new Congo, Bitty Fluff. And, just yesterday, I started spinning. My wheel should arrive Tuesday, but for now, I'm playing with a spindle.
Before my spindle arrived, some fiber arrived on Monday. I was excited to work with it, and thought I could use some practice in drafting. So, I decided to knit up something little and quick with some of the unspun BFL top I received. I drafted out the fiber a bit, to about pencil roving thickness, and cast on wildly. Here's the little item I came up with!
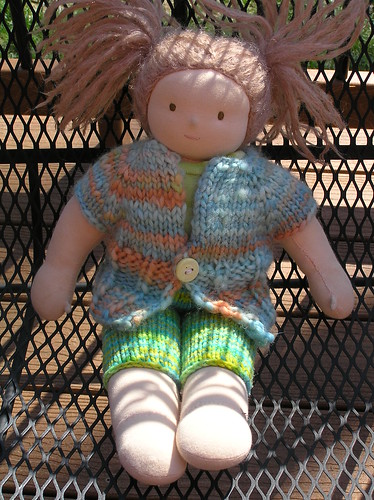
Definitely an unpolished and very simple item. Although, Jackie has declared I must make her one too, since Ella's doll is wearing this one. And, it must be made in "cute colors too!" So, I'll be repeating the process soon with another color.
I shared these pics on Hyena Cart Forums and was asked if I had a pattern so the other mom could knit one for her daughter's American Girl Doll. Since I just did a quick raglan knit, I don't think a true "pattern" for this is warranted. However, I am happy to share a quick on-the-fly pattern for the bitty sweater. So here it is.
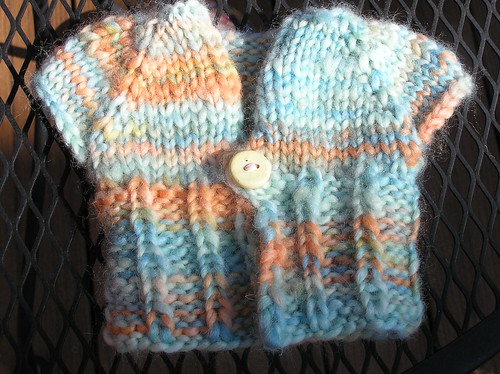
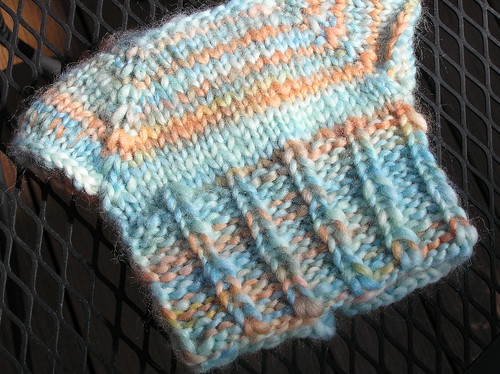
~~~~ Freckle's Unspun Dolly Cardi/Jacket ~~~~
Required Materials
NEEDLES/HOOKS
• Size 11 16" Circular Needle
• 4.5-5.5 mm Crochet Hook for weaving in ends
• button that is small enough to fit through knit stitch (no button hole is created)
YARN
• 1.5-2 oz BFL Top Spinning Fiber drafted out to pencil roving thickness or just a touch thinner (or start out with Pencil Roving from your favorite Fiber shop, or use a bulky/chunky yarn)
GAUGE
3.5 spi and 5 rpi
SIZE
Doll.... shown here on a 14" Waldorf doll. Also fits a regular sized Build a Bear, only a bit more tightly. Here's a pic on the Build a Bear.
Abbreviations:
CO - Cast On
K - Knit
P - Purl
SM - Slip Marker
KFAB - Knit Front and Back
BO - Bind Off Loosely
P2tog - Purl 2 together
And the pattern:
CO 24
Row 1: K 5, PM, K 3, PM, K 8, PM, K 3, PM, K 5
Row 2: Purl
Row 3: *Knit to one stitch before the marker, KFAB, SM, KFAB* repeat to end
Row 4: Purl
Repeat Rows 3-4 until you have 80 stitches (or 22 stitches in the back section)
Row 5: K 12, Remove Marker, BO 17, Remove Marker, K 22, Remove Marker, BO 17, Remove Marker, K 12
Row 6: Purl
Row 7: Knit
Row 8: (P 1, K 3) x 5, P2tog, K 3 (P 1, K 3) x 5, P 1
Row 9: *K 1, P 3* repeat to last stitch, K1
Row 10: *P 1, K 3* repeat to last stich, P1
Repeat Rows 9-10 7 times.
Bind Off in pattern.
Finishing:
Use a crochet hook to weave in your ends.
Add a button just above the start of the 3x1 ribbing.
Wash and block (or don't.... the sample has not been).
Give to your daughter to adorn her dolly or teddy bear!
**** Use this pattern for whatever you like. If you chose to sell one of these sweaters, please just give me credit. And if you'd like, send me some chocolate. ;-) ******
Freckle Soaker Sack
While I was at it, adding the Unspun Cardigan, I thought I'd go ahead and share my Freckle Soaker Sack pattern. I've shared it via email to any who have asked in the past, but have never polished it to Adobe format for publishing. So, here it is.... quick and dirty!
Freckle Soaker Sack
Approximate Measurements:
Preemie/Newborn:
Waist: 12”
Hips: 15 ½”
Length: 10”
Newborn/Small:
Waist: 15”
Hips: 18”
Length: 12-13”
Stitch Counts:
Waist – “waist” x “gauge” – round to multiple of 4
Hips – “hips” x “gauge” – round to multiple of 4
For the Preemie/NB size, use Double Points, 2 Circulars, or Magic Loop. For the NB/Small size, 16” circulars will work fine.
Preparation:
Determine gauge and calculate stitch counts. Since sleep sacks may be used at night, and new babes pee a lot and are on their back a lot, a slightly denser fabric than you would normally use for diapering woolies might be helpful. For example, if you are working with a worsted yarn you’d normally work up on 7’s, you might size down to 6’s. Or, use a bulkier weight yarn and knit at whatever gauge you normally would.
Waistband:
Cast on, using needles 2-3 times small than those you used to find gauge, “Waist” stitches, join being careful not to twist. Work one round of 2x2 rib, place marker at beginning of the round “A”. This will be the left hip. Continue to work 2x2 ribbing for 1”. Work an eyelet round (K2 , YO, P2tog around.) Continue with 2x2 ribbing for another inch.
Set up Hip/Body:
Begin working in stockinette this round, increasing evenly to “Hip” stitches. I like to use a bar increase as it’s hidden by the ribbing. Switch to larger needles by knitting onto them. Place stitch markers ¼ of the way around “B” and ½ of the way around “C”. You now have the center back “B” and right hip “C” marked.
Hip/Body:
Work about an inch of the body. Work 1 set of back and forth short rows (aka EZ short rows.)
To do this knit to 5 stitches past B, wrap & turn (or your choice of short row method), purl back past B to 5 stitches past B, W&T, knit to 10 stitches past B, W&T, purl back past B to 10 stitches past B, W&T, continue in this manner increasing 5 stitches past B each row until you reach the hips.
Continue working in stockinette until the front of the Sack reaches 8(10)” from cast on row.
Bottom Ribbing:
Switch to smaller needles. Decrease 4 stitches evenly around. Work 3x1 ribbing until Sack reaches 10(12-13)” from beginning. Bind off in pattern using larger needles.
Finishing:
Weave in ends, make a drawstring and work into eyelet round, wash/block, and find a babe to wear the sack!
Tuesday, January 11, 2011
Blogging Again
Well, it's been 2 years since I've blogged about anything. Ravelry was created as a place for me to post my fiber creations, Facebook came along as a place to chronicle my social endeavors, my store "FYF Soakers" got the new name of "Freckle", and my old blog went to the wayside.
I have decided that 2011 will be my year to start blogging again, and hopefully will find some new success in the Fiber World. I have just begun weaving, and have several exciting new knitting patterns in the works. Additionally, I am considering a name change for my shop. "Freckle" may soon become "Freckle's Natural Fibers". I am still playing with the possibilities though.
I have decided that 2011 will be my year to start blogging again, and hopefully will find some new success in the Fiber World. I have just begun weaving, and have several exciting new knitting patterns in the works. Additionally, I am considering a name change for my shop. "Freckle" may soon become "Freckle's Natural Fibers". I am still playing with the possibilities though.
Subscribe to:
Posts (Atom)